Introducing the New Ensemble Video Google Chrome Extension

Chromebooks and the free Google Classroom app are becoming increasingly common tools in K-12 classrooms. As of 2017, Chromebooks accounted for more than half of the mobile devices being shipped to schools. Today, the number of Chromebooks in schools continues to grow.
With this shift in mind, we created a new Google Chrome Extension to help make today’s flipped classrooms more engaging and helpful. With this extension, teachers and students can record and upload webcam or screen capture videos directly in their Chrome browsers. Then, they can share them or upload them to Ensemble Video.
The Ensemble Video Google Chrome Extension is also compatible with Google Classroom to ensure the entire flipped classroom experience is seamless and focused on learning. With the new extension, it’s easier than ever for teachers and students to create, share and manage video lessons.
How to Use the Ensemble Video Google Chrome Extension
Recording videos through our new Google Chrome Extension is perfect for students creating video projects or teachers creating supplemental video content for their classes.
[bctt tweet="With Ensemble Video's new Google Chrome extension, it’s easier than ever for teachers and students to create, share and manage video lessons."]
Here’s how you do it:
-
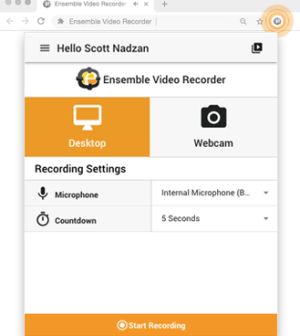
Click the Ensemble Video icon in your extensions bar.
-
In the popup, click either Desktop or Webcam to select how you’d like to record your video. Here, you can also configure your microphone settings, video quality, and set a countdown to begin recording.
-
Click “Start Recording” at the bottom of that window to begin taking your video.
-
If you’re recording a screen capture video, in another popup, you can select whether you’d like to record your full screen or one specific application window (similar to a Chromecast). Click share.
-
Give your presentation or tutorial as the extension records!
-
If you’d like to pause or stop your recording, simply click the Ensemble Video icon in the extensions bar again, and select either the Pause or Stop button.
-
When you stop recording, you’ll be prompted to name your recording and upload it to Ensemble Video. A permalink is automatically created for the video so you can share it. Additionally, the video is added to Ensemble Video where you can use available publishing tools and LMS integrations.
-
To view all of your saved recordings, click the Ensemble Video icon in the extensions bar again, and click the “view recorded media” icon in the top right corner of the box. There, you can delete, upload, download, or copy the permalink of any recordings.
It’s that easy! You can also watch our tutorial below to learn more.
If your school is interested in our premium screen capture tool, you can try Ensemble Anthem. Contact us now to set up a demo or request a free trial.


You must be logged in to post a comment Login