HOW TO: Video Conversion Part IV – DVD

One of the greatest challenges for an instructional technology professional, faculty member, or media producer is determining the best video encoding workflow for their source media content. In this six-part blog series, video guru (and Ensemble VP of Marketing And Sales) Scott Nadzan will discuss some common video sources uploaded/ingested into Ensemble Video, and help you figure out which video workflow/encoding recipe will ensure videos are optimized and ready for playback on iPads, iPhones, computers and other devices.
Welcome to the fourth installment in our six-part “summer school crash course” on video conversion, brought to you by Scott Nadzan. This week’s post focuses on DVD conversion. If you missed anything, or would like more information on this series, click here for the cheat sheet.
[sws_divider_line]
PART IV: DVD
[sws_divider_line]
Most Ensemble Video customers have a good amount of digital video disk (DVD) content. I’m sure you know all about the old optical disk used to store audio, video, or computer data. Again, I’m going to assume you made a good-faith effort to contact the copyright holder, and secured permission to convert the and stream it securely. You may want document the process. When digitizing, you’ll want to pay close attention to the format, resolution, bitrate, and FPS of the output file. There are a couple options to consider, in my opinion I would try them in this order.
Option 1: Convert .vob to .mpeg. The first thing I would try is to open up the DVD in a window, and find the “Video_TS” folder. If you’re lucky, you may be able to simply pull the .vob file (or files) from the DVD, which will save you a lot of time. You may not know this, but the .vob files are just .mpeg files in a .vob wrapper. Check out this article, it explains how you can pull a .vob file from a DVD. If the DVD has five .vob files, than you can either stitch them together with an editor, or keep them as separate chapters. If the .vob method doesn’t work, there are a couple other ways to tackle this.
Option 2: Rip a DVD. Go ahead, get ripped!
STEP 1: To rip a DVD you have to download and install DVD Ripping software, don’t panic though, we’ve found some DVD ripping software that is free and works brilliantly. I personally recommend Handbrake because it works well and it is FREE (some other options are DVD Shrink, MakeMKV, DVDFabHD and AnyDVD). Simply go to and select the link for your operating system, then install the Handbrake software when the download is complete.
STEP 2: The next thing you need to do is insert the DVD you want to rip into your PCs optical drive and then open the Handbrake program. You then need to click on the Source button located in the top left of the window.
STEP 3: From here you need to locate and select the DVD drive and click open.
STEP 4: Now that you have select the DVD that you wish to rip, you need to set a destination folder for the ripped content to be saved in. This can be done by clicking on the browse button on the right hand side of the window.
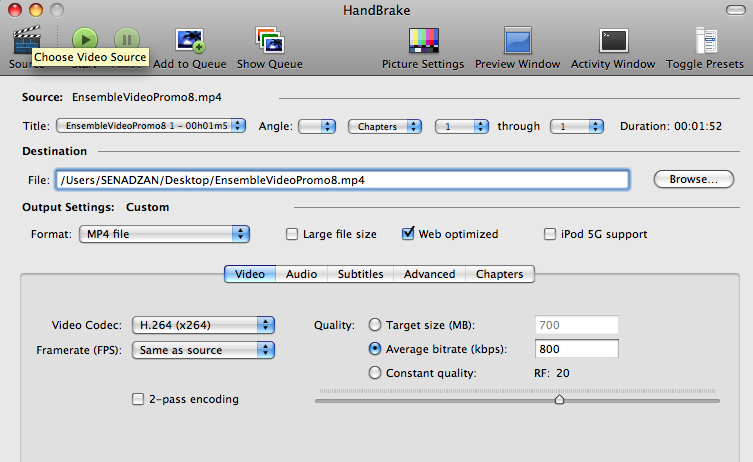
STEP 5: The last thing of note that needs doing is choosing the file preset for your ripped DVD. Handbrake comes with a good list of standard presets for you to chose from, so you can rip a DVD to the correct format for popular desktop and mobile devices. I recommend using mp4/h.264 with AAC audio. Check out these screenshots below, they illustrate the Video and Audio format settings I have used in the past.
Video Settings in Handbrake |
Audio Settings in Handbrake |
 |
 |
Click to View Full Size Image |
Click to View Full Size Image |
STEP 6: Now you have the Source, the Destination folder and have set which file format you want the DVD to be ripped to, the next and final task is the easiest off all; simply hit the Start button at the top of the Window and let Handbrake do the rest.
Option 3: Capture a DVD.
STEP 1: Purchase a capture card or capture device. You will need to purchase an internal capture cards or an external devices plug into the computer via the FireWire or USB ports. This is just a piece of hardware that converts analog content (either audio or video) to digital, for use on a computer. Manufacturers such as Diamond Multimedia (Diamond VC 500), Hauppauge (USB-Live2), Pinnacle (Dazzle DVD Recorder HD) and Grass Valley (ADVC110) produce high-quality video capture devices. I have had a lot of experience with the ADVC110, I’m big fan of that little white box.
STEP 2: Install the capture card or device. You will need to install the capture card or attach the device to your computer.
STEP 3: Attach the DVD. Connect the DVD to the capture card with cables.
STEP 4: Insert tape. Insert the DVD tape into the DVD.
STEP 5: Open video creation/capture program. You will need to use a video creation or capture program on your computer to capture the input signal.
STEP 6: Capture video in digital format. Open the capture feature of the video creation or capture program, and capture the footage by pressing play on the DVD and record in the capture window of the video creation tool or capture program.
Format
In most cases I would create a H.264/MP4 in Handbrake with AAC audio. An alternate option is to encode a high-quality intermediate file that will be transcoded to a single streaming file or adaptive bit rate file in Ensemble Video. You should experiment with some short files and figure out which format produces the best results for your audience.
Resolution
With a DVD, it can be tricky. Generally, with an older DVD the image size is 720×480 (rectangular pixels). You will likely have to resize it to 640×480, which is the display size for computers (square pixels). You will also run into newer DVDs that have larger resolution, like 1280×720 or 1920×1280. If the resolution of the file is 1280×720 or 1920×1280, I’d personally recommend ending up with a 1280×720 file. You can keep that 1920×1280 file, but if you are going to stream it to a variety of devices, I would argue the 1920×1280 is overkill for online content. Want to learn more about aspect ratios? Check out this article. Again, going by to my earlier example about stretching your favorite t-shirt, do not stretch the video! It is not going to magically increase the quality of your content.
Bitrate (amount of data in file)
You can go a couple ways with this. If you’re creating a high-quality copy that will be encoded, I would recommend creating the video with 3-4 Mbps of data in the file. This way, you’re going to be able to use an adaptive bitrate encoding recipe, and you will have a high-quality copy of the content if you need it. You can try to create the digital copy with 4-8 Mbps of data in the file, I just don’t think it’s practical if you are going to compress and stream it online. Plus, if you want to store it, you have more to store.Now, if your tool or software will create an MP4 (H.264) file, you could just make a single streaming file with 500-1200 kbps of data in the file. I’m recommending a range because some people are more conservative or aggressive with their streaming content. Also, I don’t know who your audience is and where they’re watching your videos. If you do crank out the MP4, you are reducing the need to transcode in Ensemble Video, which will reduce your processing time in Ensemble Video.
Frames Per Second (FPS)
The FPS setting is a difficult one for me to predict. Honestly, if there’s an option that says “keep the same”, I would choose that for simplicity sake. Or, if you know the frame rate at which you shot the video, it’s best to encode at that same frame rate. Your options will likely be 24, 25, or 30 FPS (frames per second). All of these look great streaming. 29.97 also works, but can sometimes cause audio sync issues.If the frame rate of your video exceeds 30 FPS, you should encode at half that frame rate. For example, if you shot 60 FPS, you should encode at 30 FPS. If you were to choose 15 FPS or lower, you will likely lose some full-motion movements. Remember those flipbooks we made when we were kids? Reducing the frame rate of your video is similar to reducing the number of pages in your flip book. Go too far, and you lose that smooth, full-motion illusion.
The Encoding Recipes
If you created a 3-4Mbps intermediate source file, here are two encoding recipes you could try along with the ingredients:
[sws_grey_box box_size="600"]
Single File Workflow Recipe
FORMAT: MP4 (H.264)
RESOLUTION: 640×360 (16×9)
BIT RATE: 900kbps
FPS: 29.97 fps[/sws_grey_box]
[sws_grey_box box_size="600"]
Adaptive Bit Rate Workflow Recipe
FILE 1
FORMAT: MP4 (H.264)
RESOLUTION: 480×270(16×9)
BIT RATE: 400kbps
FPS: 29.97 fps
FILE 2
FORMAT: MP4 (H.264)
RESOLUTION: 640×360 (16×9)
BIT RATE: 900kbps
FPS: 29.97 fps
FILE 3
FORMAT: MP4 (H.264)
RESOLUTION: 640×360 (16×9)
BIT RATE: 2000kbps
FPS: 29.97 fps[/sws_grey_box]
Remember, if you created an MP4 (H.264) when converting/capturing, you could skip encoding in Ensemble Video. You would choose an “Upload and Stream (No Transcoding)” preset.[sws_divider_line]I hope this article helps you convert your DVDs to streaming format! Check back next week for the fifth installment in this series, when we will focus on Screen Recording Software. You can also go back to the series introduction for more information.
[sws_button class="" size="sws_btn_small" align="" href="/how-to-video-conversion-pt-5/" target="_parent" label="Next Article in Series >" template="sws_btn_default" textcolor="" fontweight="normal" bgcolor="" bgcolorhover="" glow="sws_btn_glow_orange" btnwidth="" textalign=""] [/sws_button]
Related Posts


-
 Ensemble Video Acquired by Panopto
We have big news here at Ensemble: we’re becoming...
- April 21, 2021
-
 Hybrid Classes: The New Normal for Higher Ed Educators & Students
Thanks to COVID, many college students and educators who...
- March 25, 2021
-
 Extron and Ensemble Video: Upgrade Your Lecture Capture and Meeting Capture
Ensemble Video’s new integration with Extron is an upgrade...
- February 25, 2021
-
 HOW TO: Convert DVD (VOB) Files to Editable MPEGs
One of the keys to developing a content rich...
- January 13, 2011
-
 HOW TO: Create Captions in YouTube for Ensemble Video
Joel Steinfeldt, Media Communications Specialist at the University of...
- May 31, 2010
-
 HOW TO: Livestream With Adobe FMS/FMLE
With Adobe Flash Media Server and Adobe Flash Media...
- December 5, 2010
You must be logged in to post a comment Login