HOW TO: Embed a video with Flash
Embedding individual videos with a Flash-based player in a Web page can be a powerful and useful way to provide viewer access to video managed in your Ensemble Video library. It’s easy to do, and there are a few things you can do to customize how your videos look and play on your pages. ABC.
There are times when it can be very useful to embed a video right on Web page, blog, or Learning Management System page. Embedding videos can really complement the library publishing model that most Ensemble Video users also take advantage of. As you surf around Blog.ensemblevideo.com you’ll see it is chock full of videos that have been peppered around the site in this way.
For MP4, M4V, FLV, and F4V videos, you can easily embed your video with a Flash player for playback. For any Published or Viewable video in your library, Ensemble Video automatically generates an “Embed Code,” which is actually an HTML code snippet that you can copy and paste into a Web page outside of Ensemble Video.
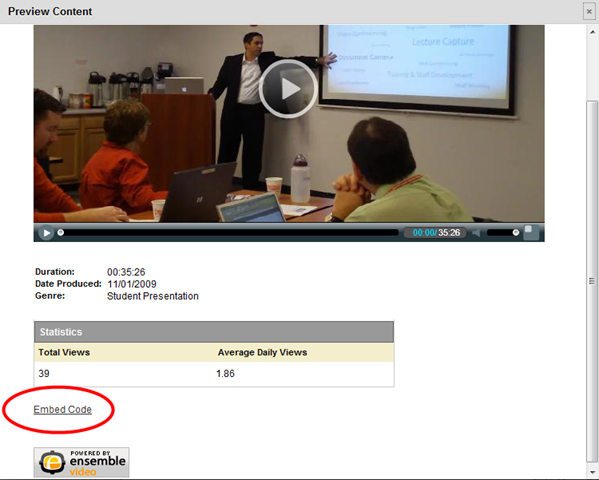
A link to the Embed Code appears at the bottom of a video detail page (accessible on any QuickPublish or HTML Plug-in video page, and also accessible from the Preview Video links in the Ensemble interface). Just scroll down to the bottom of the page, click on the Embed Code link, and a window will open, providing you access to the automatically generated, customizable Embed Code.
In most cased you can just click on the Javascript Embed Code and copy/paste into your Web page, as we’ve done here.
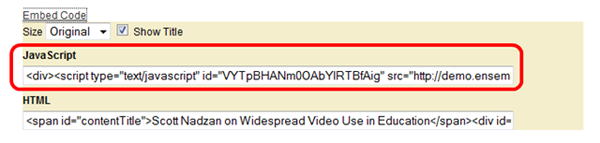
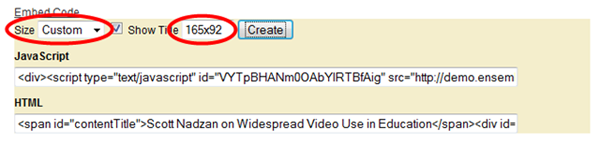
Why are there two versions, Javascript and HTML?
You will notice that there are two versions of the Embed Code: one uses Javascript, while the other is a plain HTML embed code. For some Web sites Javascript is not accepted or conflicts with other Javascript code on the site. If you encounter problems with the Javascript version, try embedding the HTML version. It won’t have some of the features of the Javascript embed code, such as dynamic updates when there are changes to video Title or Preview Images, but it should work without a hitch.
Changing the “autoPlay” setting
By default, the embed code is not set up to automatically play your video as soon as the Web page is loaded. If you want your embedded video to begin playing automatically, use the plain HTML embed code, and modify the autoPlay setting by changing “autoplay” : false to “autoplay” : true in the “url” section of the embed code where you media file is specified. This looks a bit different depending on whether your content is being delivered from a regular http Web server (called progressive download) or streamed from a dedicated media server (using the rtmp protocol). This is also a bit tricky because there are “url” sections for jpg images and the actual Flash player, so be sure you change the setting in the proper place!
Progressive Download – changing the autoPlay setting
{“url”: “mp4:yourfile.mp4″, “provider”: “rtmp”, “autoPlay”: true, “duration”: 2126}
Streaming Video – changing the autoPlay setting
{“url”: “http://mediaserver.institution.edu/videos/yourfile.mp4″, “autoPlay”: true, “duration”: 7}
Summary
With Ensemble Video you can embed individual videos with an embedded player on a Web page, Blog or learning Management System. Ensemble Video automatically generates an Embed Codes for any published or viewable video in your library, and there are some nifty options for customizing how the embedded video looks and plays on your page.
Related Posts


-
 Ensemble Video Acquired by Panopto
We have big news here at Ensemble: we’re becoming...
- April 21, 2021
-
 Hybrid Classes: The New Normal for Higher Ed Educators & Students
Thanks to COVID, many college students and educators who...
- March 25, 2021
-
 Extron and Ensemble Video: Upgrade Your Lecture Capture and Meeting Capture
Ensemble Video’s new integration with Extron is an upgrade...
- February 25, 2021
-
 HOW TO: Convert DVD (VOB) Files to Editable MPEGs
One of the keys to developing a content rich...
- January 13, 2011
-
 HOW TO: Create Captions in YouTube for Ensemble Video
Joel Steinfeldt, Media Communications Specialist at the University of...
- May 31, 2010
-
 HOW TO: Livestream With Adobe FMS/FMLE
With Adobe Flash Media Server and Adobe Flash Media...
- December 5, 2010
You must be logged in to post a comment Login